
The helix piercing remains one of the most versatile and beloved choices for anyone looking to graduate beyond standard earlobe modifications. Acting as the foundational anchor for a highly styled “curated ear,” a helix piercing offers near-infinite customizability.
Whether you are seeking a singular, minimalist accent or preparing an architectural stack of rings and studs, this definitive guide covers everything you need to know about the helix piercing, fully updated for contemporary 2026 aesthetics, safe piercing protocols, accurate healing science, and targeted troubleshooting for unexpected complications.
What is a Helix Piercing?
A helix piercing is an umbrella term for any perforation made along the upper outer rim of the ear’s cartilage. Unlike the lobe, which consists of soft, highly vascular tissue, the helix is made of semi-rigid cartilage. This anatomical difference means helix piercings require a specialized technique, specific jewelry sizing, and a longer investment in aftercare to heal successfully.
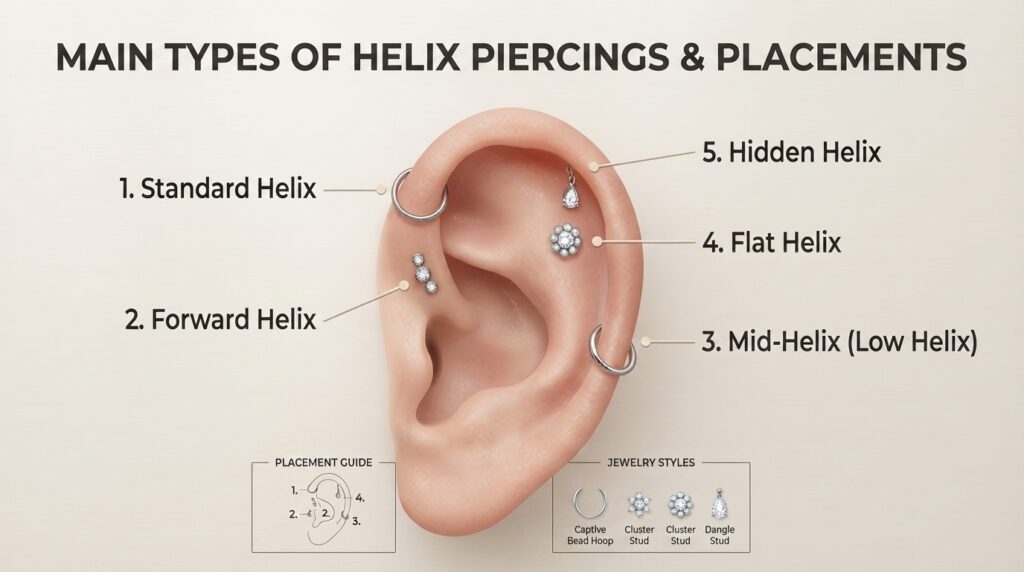
Main Types of Helix Piercings & Placements
The beauty of the upper ear rim lies in its canvas space. Piercers categorize helix variations based on where they sit relative to your facial features and the natural curve of your cartilage:
1. Standard Helix
The classic option. Located along the upper outer cartilage rim furthest from your face. It is highly adaptable and acts as a common gateway into cartilage modifications.
2. Forward Helix
Positioned on the lower front part of the helix, closest to the face and directly near the tragus. Depending on your specific anatomy, piercers can frequently stack these into double or triple forward helixes.
3. Mid-Helix (Low Helix)
Sits along the vertical outer cartilage edge, roughly halfway down between the standard upper position and the lower earlobe. This position is highly popular for seamless rings, hoops, or studs after healing.
4. Flat Helix
Though technically positioned in the flat, smooth basin of the upper ear cartilage just beneath the curled rim, it is often grouped with helix designs. It provides a wide, highly visible canvas perfect for larger statement studs or cluster gems.
5. Hidden Helix
A major architectural trend in 2026. This technique places the puncture directly under the deep overhang of the upper ear rim. The post remains completely hidden, allowing specialized dangle chains or gemstone drops to appear as if they are floating magically out from under the fold.
The Helix Piercing Process: Step-by-Step
Getting a helix piercing should always be performed by a professional body piercer using a sterile, single-use hollow needle.
Important Safety Note: Never get a cartilage piercing done with a mechanical piercing gun. Piercing guns use blunt force to ram a dull earring post through tissue, which can shatter cartilage, cause severe trauma, lead to permanent structural deformities, and dramatically increase infection risks.
- Anatomy Consultation & Marking: Step 1.
Your piercer discusses placement preferences, checks your unique anatomy to ensure it allows for the piercing, and marks the spot with a surgical pen for your approval.
2. Sterilization and Setup: Step 2.
The piercing site is deeply cleaned with an antiseptic solution to eliminate surface bacteria. The piercer prepares a sterile tray containing the single-use hollow needle and your pre-sterilized initial jewelry.
3. The Puncture: Step 3.
Using a sterile, hollow needle (never a gun), the piercer swiftly pushes through the cartilage. Clients are often instructed to exhale during this moment, and it feels like a sharp pinch.
4. Jewelry Insertion: Step 4.
An initial labret stud or hoop (typically 16G or 18G) is immediately guided into the new channel. The piercer deliberately chooses a longer post length to allow adequate room for natural swelling.
Pain Scale: Does a Helix Piercing Hurt?
On a standard pain scale of 1 to 10, most individuals rate a professional needle helix piercing at around a 4/10.
While it causes a sharper, more distinct “pinch and burn” sensation than a soft earlobe, it is significantly less painful than deeper, thicker inner-ear cartilage areas. For context, it ranks far lower on the intensity spectrum than advanced configurations:
| Piercing Type | Average Pain Rating | Primary Sensation Profile |
| Earlobe | 2/10 | Quick, mild sting; minor throbbing |
| Helix / Forward Helix | 4/10 | Sharp pinch; warm, localized burning for 1-2 hours |
| Conch / Rook | 6/10 | Deep, intense pressure; dull ache |
| Industrial / Daith | 7-8/10 | Severe pressure; notorious pain because a needle pushes through two separate points of thick cartilage in a single session |
Healing Time & Professional Aftercare Protocol
A helix piercing generally takes 6 to 12 months to fully heal. While it may look completely healed after 3 to 6 months, the inner cartilage tissues require significantly more time to fully mature and stabilize. The first 3 to 4 months represent an initial fragile period where the wound is most sensitive to infection and irritation.
The 2026 Gold Standard Aftercare Routine
To guarantee clean healing and avoid common complications, stick strictly to this protocol:
- Cleanse Twice Daily: Use a sterile saline spray twice a day to clean the area thoroughly. Do not mix salt water at home, as incorrect ratios dry out or burn raw tissues.
- Dry Gently: Moisture breeds bacteria. After spraying or showering, gently blot the area dry using clean, disposable paper towels or a hair dryer on the “cool” setting. Avoid fibrous cotton pads or cotton buds, which catch on jewelry prongs.
- Hands-Off Policy: Do not twist, turn, spin, or play with your jewelry. Moving the post tears the delicate, newly forming skin cells inside the channel, delaying recovery and causing irritation bumps.
- Sleep Smart: Avoid sleeping on the piercing. A travel pillow or donut pillow can help reduce pressure by allowing your ear to rest comfortably in the center gap.
Initial vs. Healed Jewelry Styles
The sizing and style of your initial jewelry are intentionally chosen by your piercer to accommodate the body’s natural inflammatory response.
Initial Piercing Jewelry
A reputable piercer will install a straight labret stud (a post with a flat backing disk and a removable decorative top) for your initial helix piercing. This post will look intentionally long for the first few weeksthis extra length is critical to give your ear space to swell without embedding.
- The Downsize: Wait at least 6 months before independently switching jewelry, although a professional “downsize” of the stud back to a shorter post can occur at 4 to 6 weeks to help it heal faster and avoid catching.
Healed Jewelry Options
Once your piercing has completely cleared its 6-to-12-month healing window, you can freely switch to more expressive configurations, including seamless hoops, huggies, jewelry chains, or intricate threadless gemstone clusters.
Safe Materials To Look For
Always verify your jewelry is crafted from biocompatible, tarnish-free, and hypoallergenic metals:
- Implant-Grade Titanium (ASTM F-136): The absolute gold standard. Lightweight, 100% nickel-free, and highly cost-effective.
- 14K or 18K Solid Gold: Excellent for long-term wear. Ensure it is solid gold, not plated or gold-filled, as cheap plating flakes off and exposes toxic base metals to open wounds.
- Niobium: A highly biocompatible elemental metal, perfect for ultra-sensitive individuals who react to standard metals.
Troubleshooting Common Piercing Complications
When an unexpected bump appears on a healing helix, it can be alarming. However, not all bumps are created equal. Knowing the difference between them is vital for proper recovery.
1. Irritation Bumps (Granulomas)
- Appearance: Firm, red, pink, or skin-colored fleshy rings directly encircling the entrance or exit hole of the piercing.
- Cause: Chronic physical stress or friction (e.g., sleeping on the ear, accidental snagging, or leaving an initial long post in for too long, which tilts the channel).
- Treatment: Eliminate the friction trigger. Switch to a shorter post via a professional downsize, sleep on a travel pillow, and follow a strict hands-off policy.
2. Fluid Blisters (Pustules)
- Appearance: Small, translucent, or yellowish blisters that closely resemble a pimple. They are soft to the touch and can look shiny or tight.
- Cause: Excess moisture retention (e.g., leaving the ear damp after showers) or over-cleaning with harsh chemicals.
- Treatment: Keep the area meticulously dry. After cleaning with sterile saline, use a hair dryer on the “cool” setting to evaporate all lingering moisture from the ear fold.
3. Keloids
- Appearance: Extremely hard, rubbery, smooth, bulbous masses that can range from pink to dark purple.
- Cause: A genetic overproduction of dense collagen scar tissue during wound healing.
- Treatment: Unlike irritation bumps or blisters, true keloids are rare and will not go away on their own; they actively expand well beyond the boundaries of the original piercing. They require medical intervention from a dermatologist, such as corticosteroid injections, cryotherapy, or specialized pressure therapy.
Red Flag Warning: If your piercing bump is accompanied by radiating heat, severe throbbing pain, spreading redness, extreme swelling that swallows the jewelry, or thick, foul-smelling green discharge, you may be dealing with a cartilage infection. See a doctor immediately for prescription oral antibiotics, as cartilage lacks a direct blood supply to fight off deep pathogenic infections easily.
Cultural, Structural & Practical FAQs
Is a helix piercing allowed in Islam (Haram vs. Halal)?
In mainstream contemporary Islamic jurisprudence, ear piercings (including the helix) are widely considered permissible (Halal) for women, as they fall under the category of traditional bodily beautification and adornment ($Zinah$). They do not permanently alter the creation of Allah in a prohibited manner. However, modesty guidelines dictate that the jewelry should primarily be displayed in private or among immediate family ($Mahram$). For men, standard opinion leans toward it being discouraged or impermissible ($Haram$) if it emulates traditional women’s adornments within a specific culture.
What is the “2/3 Piercing Rule”?
The 2/3 piercing rule is a safety guideline followed by modern professional body piercers. It states that you should never have more than 2 to 3 cartilage piercings healing simultaneously on your body at one time. Cartilage receives very little direct blood flow compared to soft tissue, meaning your immune system must work significantly harder to mend it. Attempting to heal 4 or more cartilage channels simultaneously overburdens your body, drastically multiplying your healing times and increasing your risk of chronic inflammation.
How much does a helix piercing cost?
Depending on your geographic region and the prestige of the studio, a professional needle piercing session typically costs between $40 and $80 for the service fee. The final cost will depend on the cost of the jewelry you select (basic titanium vs. luxury solid gold gems).
2026 Trend Spotlight: Architectural Curation
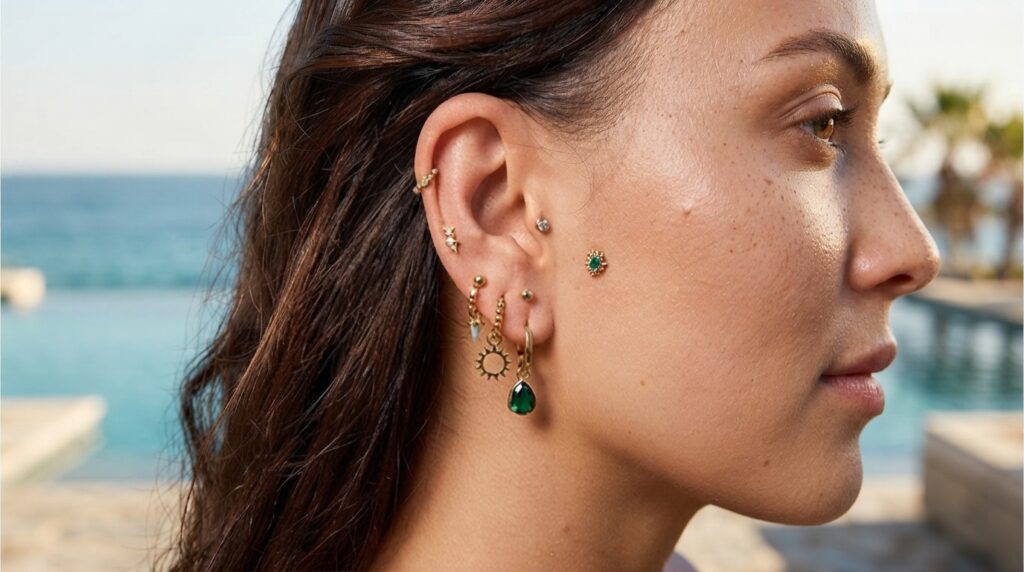
In 2026, ear styling has pivoted away from cluttered, chaotic assortments toward intentional, balanced, and architectural designs. Instead of crowding every available millimeter of your outer cartilage rim, focus heavily on negative space- leaving clean gaps of open skin between your piercings to let your individual statement gems truly shine.
Consider mixing a singular bold flat helix piece with a delicate, ultra-thin hidden helix chain to create depth, motion, and a layout completely unique to your ear’s natural contours.